Free step-by-step lessons

Draw Realistic Wild Animals with Pencil

Follow these structured lessons to build accurate proportions, natural fur, convincing eyes, and strong graphite values. Work slowly, compare your drawing with the reference after every stage, and keep your first lines light.

Start with the lionView materials
🦁 Lion portraitConstruction, face, mane and final values 🐆 Leopard portraitHead structure, rosettes, fur and contrast 🐅 Tiger tutorialFull body proportions, stripes and shading 🐎 Horse PortraitHead proportions, mane and realistic shading🐺 Wolf FaceEyes, fur layers and texture🐘 ElephantSkin wrinkles and trunk structure🦅 Eagle HeadBeak, feathers and sharp eyes🐶 Dog PortraitFacial proportions and soft fur
Before you begin

Recommended drawing materials

You do not need expensive equipment. A small, dependable set of pencils and good paper is enough for every lesson on this page.

  • HB pencil for construction
  • 2B pencil for middle values
  • 4B or 6B pencil for deep shadows
  • Kneaded eraser for soft highlights
  • Precision eraser or eraser pencil
  • Blending stump or clean tissue
  • Smooth heavyweight drawing paper
  • Sharpener and scrap paper
Lesson 01 · Beginner to intermediate

How to Draw a Realistic Lion Portrait

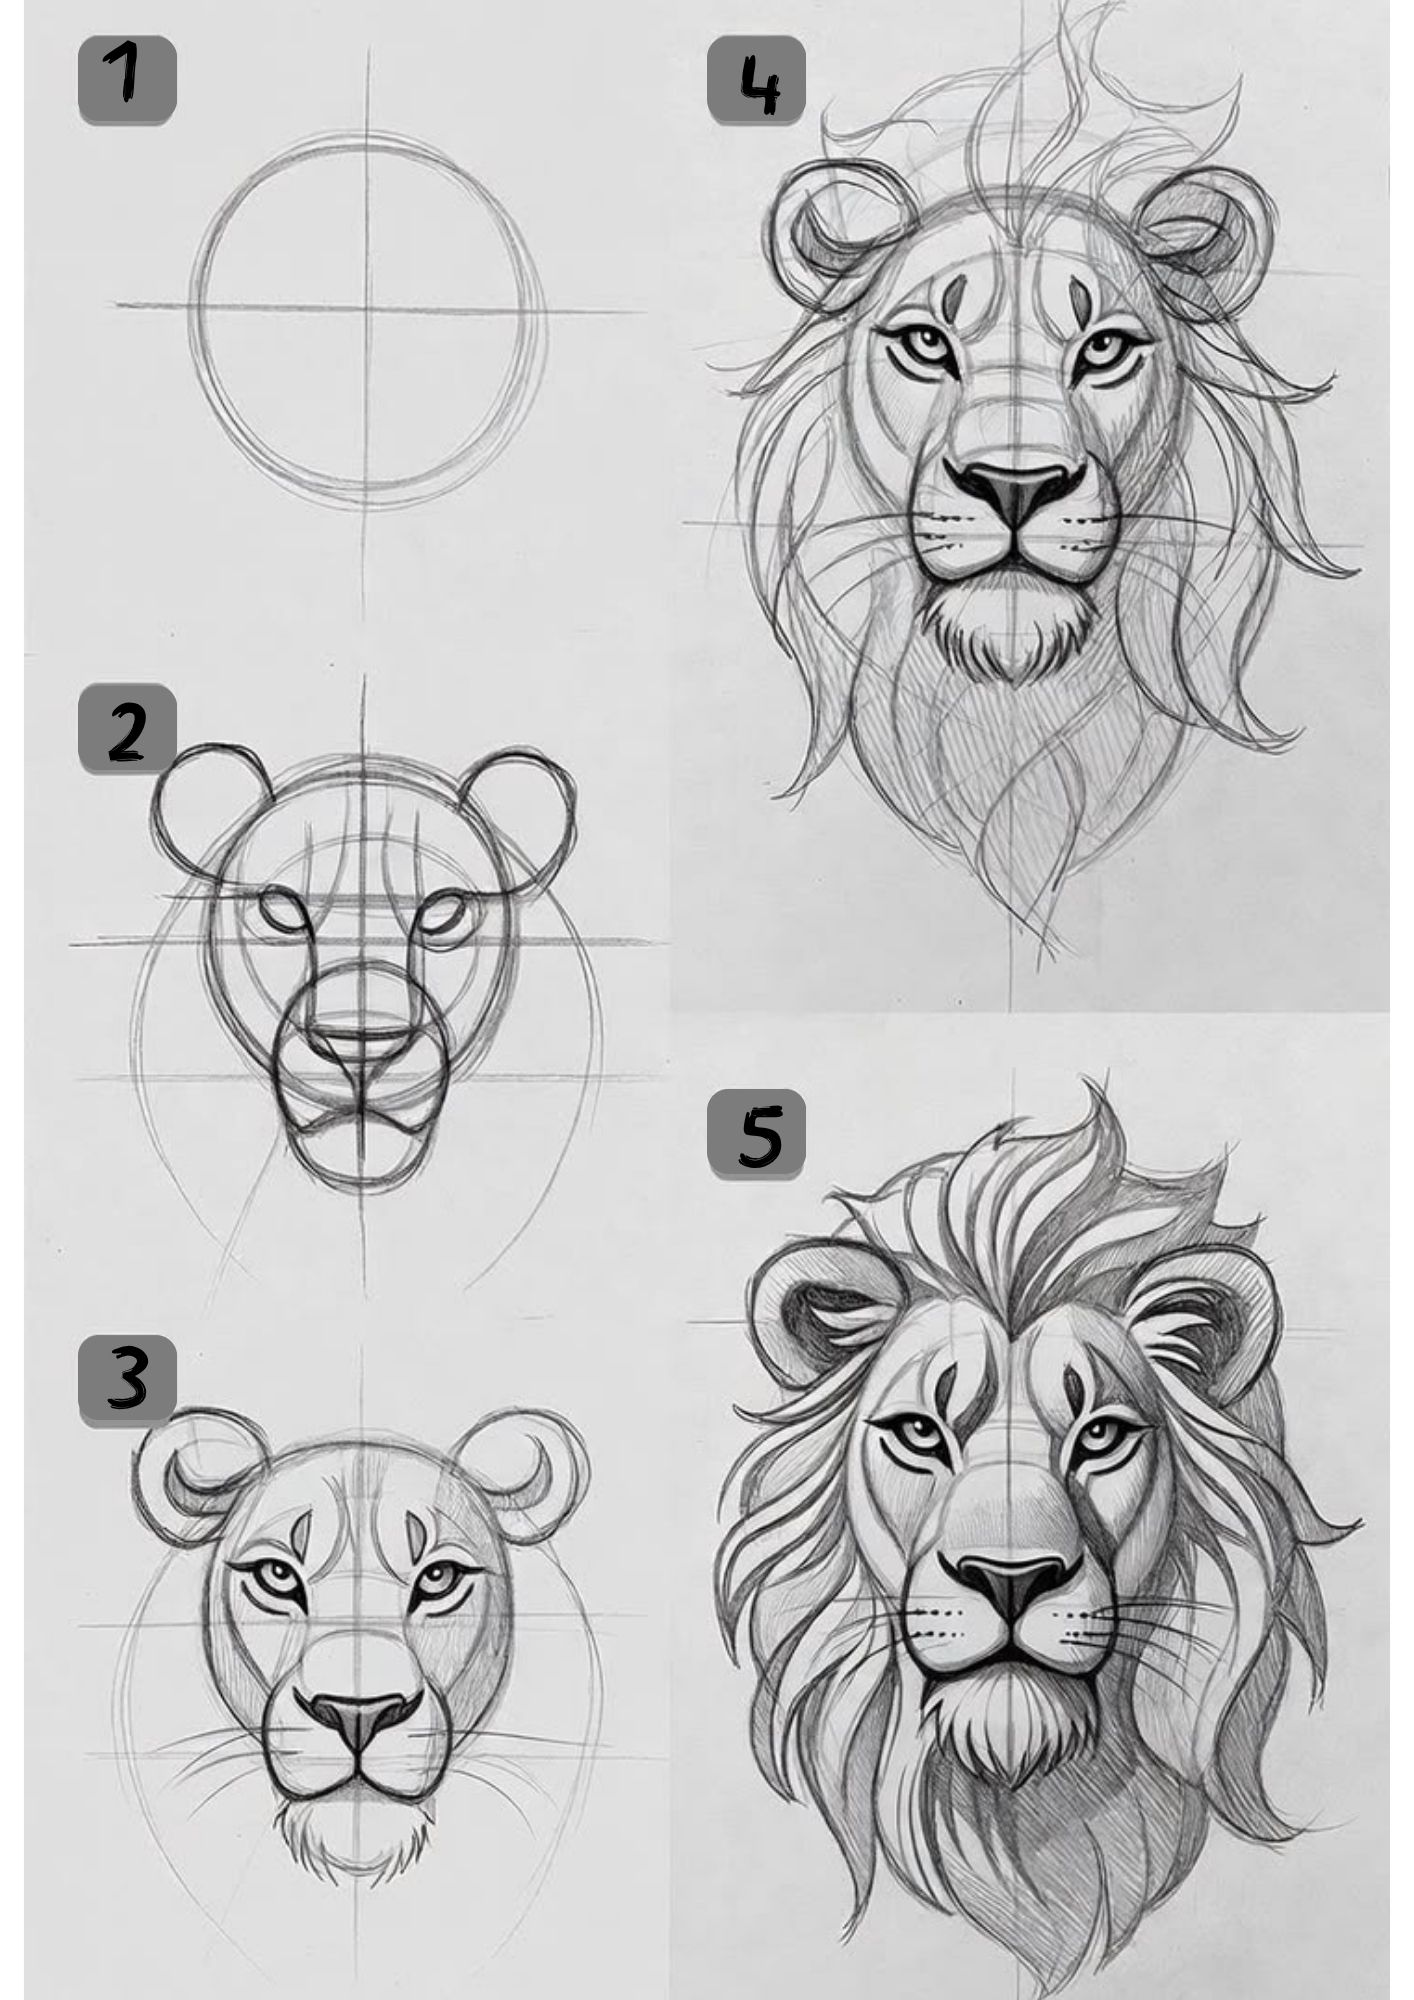
This lesson combines the lion construction and face-reference images from your collection. The goal is to establish symmetry first, then develop the muzzle, eyes, ears and mane without losing the original proportions.

Time: 60–90 minPencils: HB–6BFocus: symmetry & mane
Five-stage realistic lion pencil drawing tutorial
Reference: five-stage lion construction, facial development and mane rendering.

Step-by-step lesson

1

Block in the head

Draw a light circle for the skull. Add a vertical centre line and a horizontal eye line. Place two rounded ear shapes near the upper sides. Keep every mark faint so it can be adjusted.

2

Build the muzzle

Add a broad muzzle beneath the centre of the circle. Place the nose as a flattened dark triangle, then divide the muzzle with a short vertical line. Check that both sides have equal width.

3

Place the eyes and cheek planes

Draw almond-shaped eyes on the guide line. Lions have heavy upper eyelids, so darken the top edge more than the lower edge. Indicate the cheek planes using soft curved lines from the eyes toward the muzzle.

4

Refine the facial features

Shape the nostrils, mouth corners and whisker pads. Add short fur around the forehead and cheeks. Erase unnecessary construction lines while preserving the centre line until symmetry is secure.

5

Develop the mane

Organize the mane into large clumps before drawing individual hairs. Use curved strokes that follow the growth direction. Alternate light and dark groups to create depth rather than filling the mane with identical lines.

6

Finish with values and highlights

Deepen the pupils, nostrils, mouth line and shadows beneath the mane with 4B–6B. Lift highlights from the eyes, nose and selected hair strands using a kneaded or precision eraser.

Lesson 02 · Intermediate

How to Draw a Realistic Leopard Face

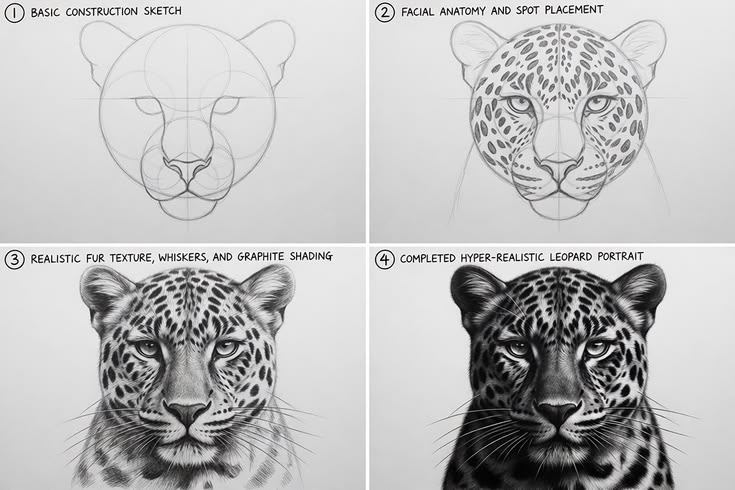
A leopard portrait depends on clean facial structure and carefully controlled rosettes. Treat the spots as patterns wrapping around a three-dimensional head—not as flat symbols placed randomly on the page.

Time: 90–120 minPencils: 2H–6BFocus: spots & short fur
Four-stage realistic leopard face pencil tutorial
Reference: basic construction, facial anatomy, fur and spot placement, and final contrast.

Step-by-step lesson

1

Create the head framework

Sketch an oval for the skull and taper it toward the muzzle. Draw a vertical centre line and two horizontal guides for the eyes and nose. Add small rounded ears on both upper corners.

2

Map the facial anatomy

Place the eyes, nose, mouth and whisker pads. The nose should sit below the midpoint of the face. Keep the eyes level and angle their inner corners slightly downward toward the nose.

3

Establish the main light and shadow

Shade the eye sockets, nose bridge, cheeks and underside of the muzzle using light layers. Blend only enough to unify the values; retain visible pencil texture for fur.

4

Place the rosette pattern

Begin with the largest spots around the forehead and cheeks. Change their size and direction as they move around the head. Leave lighter gaps inside many rosettes and avoid evenly spaced patterns.

5

Render short fur

Use a sharp 2B pencil and short directional strokes. Fur on the forehead moves upward, cheek fur moves outward, and muzzle fur is shorter and lighter. Work around the spots rather than covering them.

6

Increase contrast selectively

Darken the pupils, upper eyelids, nostrils and the deepest portions of the rosettes. Preserve bright highlights in the eyes and a few whiskers to keep the face alive.

Lesson 03 · Intermediate

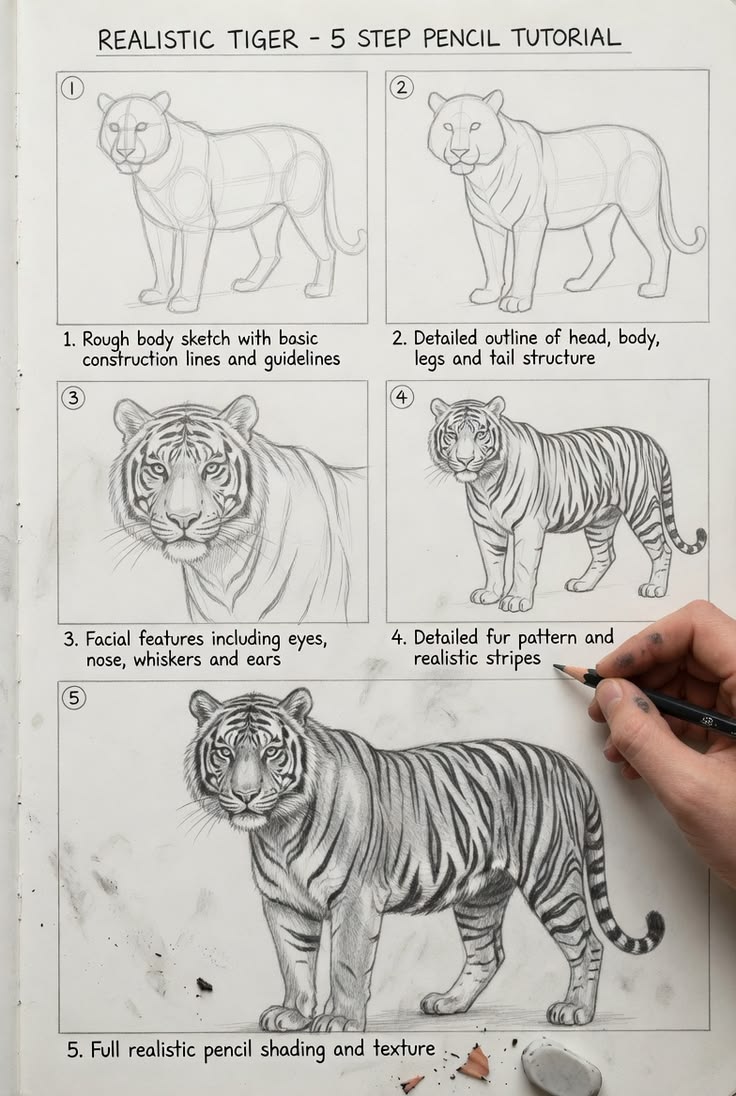
How to Draw a Realistic Tiger

This lesson uses the full-body tiger reference and an additional big-cat construction image. Focus first on gesture and body proportions. Stripes should be added only after the body feels solid and balanced.

Time: 2–3 hoursPencils: HB–8BFocus: anatomy & stripes
Five-step realistic full-body tiger pencil tutorial
Reference: full-body tiger construction, feature placement, stripes and final shading.

Step-by-step lesson

1

Draw the gesture and body masses

Use a flowing line for the spine. Add simple ovals for the chest, pelvis and head. Connect them lightly and indicate the leg directions with single lines before drawing any contours.

2

Build the legs and head

Turn the leg guides into tapered cylinders and block in the paws. Shape the head with a rounded skull and box-like muzzle. Check that the tiger’s weight is supported naturally by the standing legs.

3

Refine the silhouette

Define the shoulders, belly, hips, tail and neck. Use smooth curves rather than many short uncertain lines. Erase inner construction marks after the overall pose is convincing.

4

Add facial features and stripes

Place the eyes, nose and ears, then add stripes that follow the body’s contours. Stripes on the torso wrap around the rib cage, while leg stripes curve around cylindrical forms.

5

Shade the fur masses

Lay in broad middle values across the orange-fur areas while keeping the chest, muzzle and inner legs lighter. Use directional strokes to suggest fur without drawing every hair.

6

Complete the final contrast

Deepen the stripes and cast shadows with 6B–8B. Add fine whiskers, eye highlights and selected light fur with an eraser. Step back frequently to confirm that the tiger still reads clearly from a distance.

Lesson 04 · Beginner

How to Draw a Realistic Horse Portrait

Learn to create a realistic horse portrait using simple construction, accurate proportions, layered shading and natural texture.

Time: 60–90 minPencils: HB–6BFocus: Form & Texture
Horse Portrait
Step-by-step horse portrait reference.

Step-by-step lesson

1

Sketch the framework

Lightly draw basic circles and guide lines.

2

Refine the outline

Correct proportions and define the silhouette.

3

Add key features

Draw the eyes, nose and important details.

4

Build values

Shade from light to dark with smooth layers.

5

Create texture

Use directional pencil strokes for realism.

6

Final touches

Increase contrast and lift highlights with an eraser.

Lesson 05 · Beginner

How to Draw a Realistic Wolf Face

Learn to create a realistic wolf face using simple construction, accurate proportions, layered shading and natural texture.

Time: 60–90 minPencils: HB–6BFocus: Form & Texture
Wolf Face
Step-by-step wolf face reference.

Step-by-step lesson

1

Sketch the framework

Lightly draw basic circles and guide lines.

2

Refine the outline

Correct proportions and define the silhouette.

3

Add key features

Draw the eyes, nose and important details.

4

Build values

Shade from light to dark with smooth layers.

5

Create texture

Use directional pencil strokes for realism.

6

Final touches

Increase contrast and lift highlights with an eraser.

Lesson 06 · Beginner

How to Draw a Realistic Elephant

Learn to create a realistic elephant using simple construction, accurate proportions, layered shading and natural texture.

Time: 60–90 minPencils: HB–6BFocus: Form & Texture
Elephant
Step-by-step elephant reference.

Step-by-step lesson

1

Sketch the framework

Lightly draw basic circles and guide lines.

2

Refine the outline

Correct proportions and define the silhouette.

3

Add key features

Draw the eyes, nose and important details.

4

Build values

Shade from light to dark with smooth layers.

5

Create texture

Use directional pencil strokes for realism.

6

Final touches

Increase contrast and lift highlights with an eraser.

Lesson 07 · Beginner

How to Draw a Realistic Eagle Head

Learn to create a realistic eagle head using simple construction, accurate proportions, layered shading and natural texture.

Time: 60–90 minPencils: HB–6BFocus: Form & Texture
Eagle Head
Step-by-step eagle head reference.

Step-by-step lesson

1

Sketch the framework

Lightly draw basic circles and guide lines.

2

Refine the outline

Correct proportions and define the silhouette.

3

Add key features

Draw the eyes, nose and important details.

4

Build values

Shade from light to dark with smooth layers.

5

Create texture

Use directional pencil strokes for realism.

6

Final touches

Increase contrast and lift highlights with an eraser.

Lesson 08 · Beginner

How to Draw a Realistic Dog Portrait

Learn to create a realistic dog portrait using simple construction, accurate proportions, layered shading and natural texture.

Time: 60–90 minPencils: HB–6BFocus: Form & Texture
Dog Portrait
Step-by-step dog portrait reference.

Step-by-step lesson

1

Sketch the framework

Lightly draw basic circles and guide lines.

2

Refine the outline

Correct proportions and define the silhouette.

3

Add key features

Draw the eyes, nose and important details.

4

Build values

Shade from light to dark with smooth layers.

5

Create texture

Use directional pencil strokes for realism.

6

Final touches

Increase contrast and lift highlights with an eraser.

Frequently asked questions

Which pencil should a beginner use first?

Start with HB for construction and 2B for basic shading. Add 4B or 6B only when you are ready to deepen the darkest values.

Should I blend all graphite shading?

No. Blend broad skin or soft-shadow areas lightly, but keep visible directional pencil strokes in fur. Excessive blending can make animal hair look smooth and unnatural.

How can I improve facial symmetry?

Use a centre line, compare matching landmarks on both sides, and view the drawing in a mirror or phone camera. Correct large proportion errors before adding fur and texture.

May I publish drawings made from these references?

Use reference images only when you own them or have permission to reproduce them. For commercial publishing, confirm the image licence and add your own original teaching text and artwork.

💬 WhatsApp Order